Arduino RTC Turorial
Project description
A very common need when dealing with Arduino projects is Time, and I always see questions about Arduino RTC usage. Keeping time is crucial for many projects, not just clocks 🙂 You can time processes down to the MS or control relays for lighting years in advance. I thought I would put together a simple tutorial showing how to implement the Time.H library and use various RTC and GPS modules to increase accuracy and overall experience.
Lets Get Started
So to keep time on Arduino
Keeping time on Arduino can be as simple as keeping track of millis() for a brief time or as complicated as accounting for whatever rollover or time frames are needed. This is essentially how the Time library works, but it can get rather complicated keeping track of everything and performing conversions. This is why I find its just easier to use the already pretty robust time library and its counter part TimeAlarms.h. the Alarms library is for timers, alarms and repeated tasks it carries a bit of overhead but is useful.
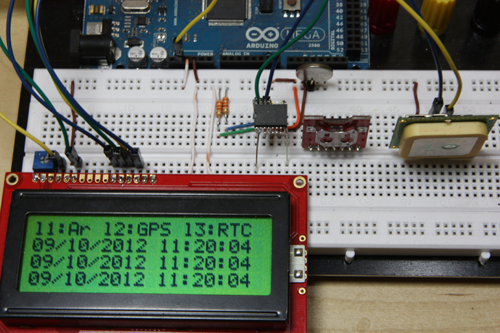
We’ll first take a quick look at the time_t structure and see how its implemented to create a fairly portable time object that is able to be used with many different platforms. Then well move on building a simple clock and showing why the standard Arduino resonators aren’t the best for time keeping and then show how an RTC module can help with this.
You can basically interchange the GPS and RTC modules with the TIme library which is another reason why its handy. You essentially treat any time source the same, and just may need to implement an interface (plus a get method).
Once we learned how to use the SyncProvider and can provide a stable clock its time to create some timers, these can be useful for a number of things from playing music on wake up to performing repeated tasks at exact intervals. I use timers quite a bit they are easy to setup and work quite well!
Time.h Unix time and time_t structs
Time.h makes everything easier, it uses unix time structure
At the heart of the Time library is the Unix time_t style time components and the Unix epoch of Jan 1, 1970. Time is kept by using the number of seconds from Unix epoch as an offset which allows us to build smaller logic time units out of its components and convert these between themselves. I.E seconds to minutes , hours to day and different even different time objects themselves. Basically we can take a date and time using the epoch convert this into almost any format needed!
Each time object can be assembled from or broken into time_t structures, these basically present each portion of a time date out. Seconds, Minutes, Hours, Days, Month and Year are all parts of a time_t struct instance. Its handy to understand this as sometimes you may need to manipulate a time object, an example is adjusting for timezone. In order to make time officially UTC compliant to to account for timezone and location differences. In the example where GPS comes into play we will use an offset to account for this.
Lets go ahead and look at a couple popular RTC units and see how they hook up, then we can look at some example code. We’ll look at just using the Arduino, then how to read and write to the RTC and then how to use a SyncProvider method to keep the arduino in sync with the rtc. The good thing is while we have to use I2C or SPI the existing libraries take care of most of the work and its a good example to get used to using other serial protocols!
Chronodot and DeadOn modules
Some premade modules makes adding a RTC easy, or you can make your own!
First up are the Chronodot and DeadOn modules from Macetech and Sparkfun. These awesome modules make using a SOIC RTC with an Arduino very easy. They are built on my goto RTC ICs the DS3231 and DS3234 and breakout all the needed pins (sqwave out etc…). The only real difference is the serial protocol they use. If you need an I2C rtc choose one based on the DS3231(Chronodot) or if SPI is your wanted communication method then go with the DeadOn(DS3234).
There are many RTC libraries out there and even a couple for the DS3231, but most of them don’t include the temperature register as well so I created a library for this and for the DS3234 as well and they are made to be Time.h friendly. So lets start with the I2C example using a DS3231, and take a look at the Libraries and than an example of this in action!
Library Header
A simple library header for the DS3231 RTC
#ifndef DS3231RTC_h
 #define DS3231RTC_h

#include <Time.h>

// library interface description
 class DS3231
 {
 // user-accessible "public" interface
 public:
 DS3231();
 static time_t get();
 static void set(time_t t);
 static void read(tmElements_t &tm);
 static void write(tmElements_t &tm);
 float getTemp();

private:
 static uint8_t dec2bcd(uint8_t num);
 static uint8_t bcd2dec(uint8_t num);
 };

extern DS3231 RTC;

#endif
And now for our Implementation File Header
A simple library for the DS3231 RTC
#include <Wire.h>
#include "DS3231RTC.h"

#define DS3231_I2C_ID 0x68

DS3231::DS3231()
{
 Wire.begin();
}

// PUBLIC FUNCTIONS
time_t DS3231::get() // Aquire data from buffer and convert to time_t
{
 tmElements_t tm;
 read(tm);
 return(makeTime(tm));
}

float DS3231::getTemp()
{
 float temp3231;
 Wire.beginTransmission(DS3231_I2C_ID);
 Wire.write(0x11);
 Wire.endTransmission();
 Wire.requestFrom(DS3231_I2C_ID, 2);
 if(Wire.available())
 {
 int tMSB = Wire.read(); //2's complement int portion
 int tLSB = Wire.read(); //fraction portion
 temp3231 = (tMSB & 127); //do 2's math on Tmsb
 temp3231 += ( (tLSB >> 6) * 0.25 ); //only care about bits 7 & 8
 }
 else
 {
 //oh noes, no data!
 }
 return temp3231;
}

void DS3231::set(time_t t)
{
 tmElements_t tm;
 breakTime(t, tm);
 tm.Second |= 0x80; // stop the clock
 write(tm);
 tm.Second &= 0x7f; // start the clock
 write(tm);
}

// Aquire data from the RTC chip in BCD format
void DS3231::read( tmElements_t &tm)
{
 Wire.beginTransmission(DS3231_I2C_ID);
 Wire.write(0x00);
 Wire.endTransmission();

 // request the 7 data fields (secs, min, hr, dow, date, mth, yr)
 Wire.requestFrom(DS3231_I2C_ID, tmNbrFields);

 tm.Second = bcd2dec(Wire.read() & 0x7f);
 tm.Minute = bcd2dec(Wire.read() );
 tm.Hour = bcd2dec(Wire.read() & 0x3f); // mask assumes 24hr clock
 tm.Wday = bcd2dec(Wire.read() );
 tm.Day = bcd2dec(Wire.read() );
 tm.Month = bcd2dec(Wire.read() );
 tm.Year = y2kYearToTm((bcd2dec(Wire.read())));
}

void DS3231::write(tmElements_t &tm)
{
 Wire.beginTransmission(DS3231_I2C_ID);
 Wire.write(0x00); // reset register pointer

 Wire.write(dec2bcd(tm.Second)) ;
 Wire.write(dec2bcd(tm.Minute));
 Wire.write(dec2bcd(tm.Hour)); // sets 24 hour format
 Wire.write(dec2bcd(tm.Wday));
 Wire.write(dec2bcd(tm.Day));
 Wire.write(dec2bcd(tm.Month));
 Wire.write(dec2bcd(tmYearToY2k(tm.Year)));

 Wire.endTransmission();
}
// PRIVATE FUNCTIONS

// Convert Decimal to Binary Coded Decimal (BCD)
uint8_t DS3231::dec2bcd(uint8_t num)
{
 return ((num/10 * 16) + (num % 10));
}

// Convert Binary Coded Decimal (BCD) to Decimal
uint8_t DS3231::bcd2dec(uint8_t num)
{
 return ((num/16 * 10) + (num % 16));
}

DS3231 RTC = DS3231(); // create an instance for the user
As you can see we take care of our I2C communication inside the Library, and this is why it is implemented as a singleton. Since only one device with that address can be used on a single I2C bus at a time it makes perfect sense to create our library with this in mind. The heart of it all is our get, set, read and write methods, which simply do as their name implies 🙂
Our Time Example Sketch
now with the library implemented we can read the time from the RTC and not worry about it, we can also get the temperature too!
#include <Time.h>
#include <Wire.h>
#include <DS3231RTC.h> // A simple DS3231 Library meant for use with Time.h also implements temp readings

void setup() {
 Serial.begin(9600);
 setSyncProvider(RTC.get); // the function to get the time from the RTC
 if(timeStatus()!= timeSet)
 Serial.println("Unable to sync with the RTC");
 else
 Serial.println("RTC has set the system time");
}

void loop()
{
 digitalClockDisplay();
 delay(1000);
}

void digitalClockDisplay(){
 // digital clock display of the time
 Serial.print(hour());
 printDigits(minute());
 printDigits(second());
 Serial.print(" ");
 Serial.print(day());
 Serial.print(" ");
 Serial.print(month());
 Serial.print(" ");
 Serial.print(year());
 Serial.print(" ");
 Serial.print(RTC.getTemp()); //These last few lines are the only other change to the the Time.h example!
 Serial.print((char)223);
 Serial.print('C');
 Serial.println();
}

void printDigits(int digits){
 // utility function for digital clock display: prints preceding colon and leading 0
 Serial.print(":");
 if(digits < 10)
 Serial.print('0');
 Serial.print(digits);
}

Arduino RTC Turorial by Sparky’s Widgets is licensed under a Creative Commons Attribution-ShareAlike 3.0 Unported License.Based on a work at http://www.sparkyswidgets.com/portfolio-item/arduinortctutorial/.